Posted in DIY Tutorials, Uncategorized

DIY Two Stepper Stool

Hey there! I wanted to share some awesome plans with you my friend Alex Hicknell created for the cutest step stool ever!! Check it out and happy building!

img_1159


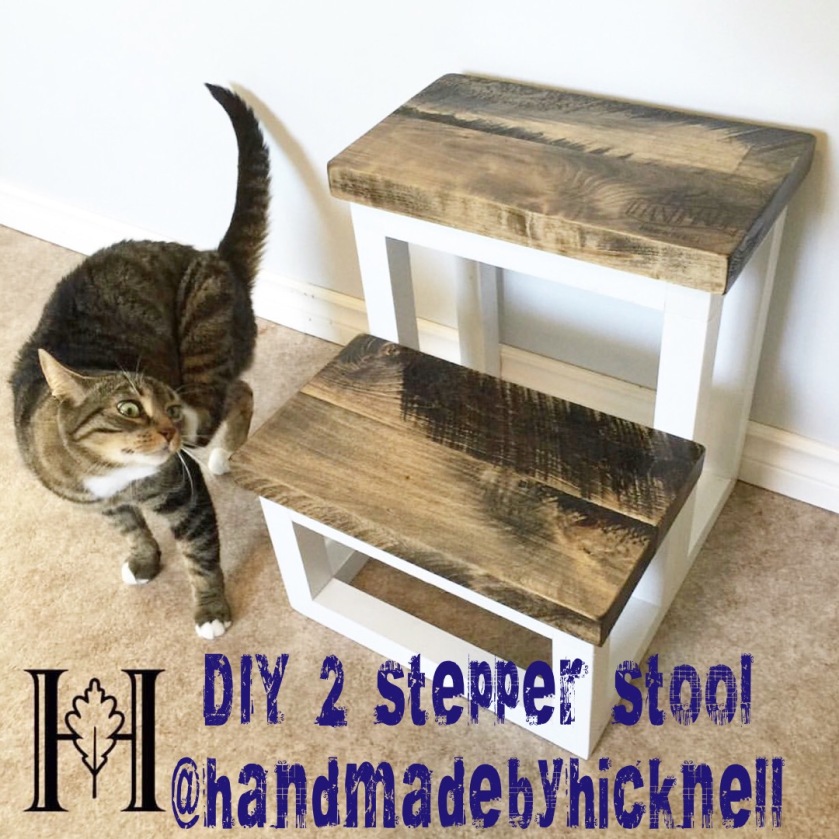
TWO STEPPER STOOL PLANS

The original stool was built out of Pine 2×2’s and soft wormy maple, but we’ll substitute Pine 2×6’s for the top. The pieces I used came from the lumber mill with those sweet saw blade marks already on them, but if you want a similar look just take a reciprocating saw on its side and run it along the top. Safety first, go slow and wear protective gear!
A lot of the 2x2s will be reinforced with screws and if we drill all of them directly in the centre some screws may line up and hit each other. To alleviate this I predrilled all holes slightly down from centre and when it came time for another screw crossing through I would aim a little higher than centre.
Good luck and happy building!

Materials List
-2” Screws
-2.5” Pocket hole screws
-Wood Glue
-Pine 2×2’s – 2 @ 9’
-Pine 2×6’s – 1 @ 5’
-Kreg Jig

Cut List
4 – 2×2 @ 13” (Rear Risers)
4 – 2×2 @ 5” (Front Risers)
2 – 2×2 @ 21” (Base)
4 – 2×2 @ 10.5” (Upper Step supports)
5 – 2×2 @ 11” (Horizontal separators)

4 – 2×6 @ 14 7/8” (Step Tops)

Step By step Guide
Step 1:
Start with one of your base pieces (21”) and attach the front riser (5”) on top but flush to the front by pre-drilling from below then attaching with a 2” screw and wood glue. Repeat this step and start building another identical piece.

Step 2:
Add the second of the front risers (5”). The back of it will sit at 10.5” from the front. Use the same method by pre-drilling from below and screwing together with glue and a 2” screw. Repeat for other side.

Step 3:
Attach the upper step supports (10.5”) to the top of the two front risers in the same manner, for each side.

Step 4:
Attach the front rear riser (13”). I recommend gluing and clamping it to the 5” front riser we just attached in step 2, then pre-drill and screw them from below and also to the upper step support (in step 3) from the back. Repeat for other side.
Step 5:
Add the back rear riser (13”) from below flush to the end of the base. Repeat for other side.
Step 6:
Attach the rear upper step support (10.5”) by pre-drilling and screwing from above. Make sure both the front and back are flush. Repeat for other side
Step 7:
Take your two identical pieces and attach them together with the horizontal separators (11”). If you are planning to paint the base you can attach in the same method by pre-drilling and screwing together. If you would rather stain the base you can hide these screw holes by using pocket holes and screws. For the base separators keep them situated underneath and for the top above (Duh!)
The best way to do this is by attaching all 5 separators (11”) to one of the side pieces (one flush at the front to the base, one flush to the back of the base, one at the front and one at the back of the top step supports and finally one at the front of the lower step support). Then take the other identical piece and attach in the same manner to all 5 points. Glue and clamps help a lot here.

Step 8:
Now would be a good time to paint your structure (if that’s the look you want!) so as to keep the tops pristine! Give it a sand first and fill all screw holes that bug ya. I like to sand down all the edges to give it a rounded look and feel. But that’s up to you.

Step 9:
Take two of your 2×6’s and attach them to each other using pocket holes and glue underneath. Repeat for the other step (both should be identical)

Step 10:
Stain your two steps before attaching. Its less messy than finishing it all as one piece. But give them a sand first and round off the corners and edges (this bad boy is the same height as your shins, trust me when I say rounded is the way to go!)

Step 11:
Once your paint and stain have dried, centre the bottom step. The easiest way to attach is by clamping it to the supports and pre-drilling then screwing with 2” screws from underneath. Its ok if you have to angle them in, you’ll never see them. Do the same for the top step. I recommend having this step flush at the back (same as the bottom one) so it will sit perfectly against a cupboard or shelf. If you are using it agains a wall with a baseboard you can have a slight overhang on the back (I think I’m over explaining this, you’re all big boys and girls, so feel free to make your own decisions!)

Step 12:
Once every thing is attached together give it all a coat or two of polyurethane. I like semi gloss….but again you’re all adults (or semi responsible children) so do what you like! Depending on your floor I would also suggest adding little felt pads to the bottom so you don’t mark up the floor, but be careful because this also makes the stool slide easier!
And that’s it! This was my first set of plans so I hope I covered everything! If any of you build this cutie please tag me in your work, I’d love to see it! #hicknelltwostepperstool

-Alex
@handmadebyhicknell
#handmadebyhicknell

Posted in DIY Tutorials, Uncategorized

DIY Finishing Your Furniture


Today I wanted to share some tips from a few experts on how they finish their products. We asked Bryant from @camille_woodworking, Alex from @Mr_buildit, and Amanda from @rusticduckfurniture. They each produce beautiful furniture, but all finish their products differently!

Here’s a video by Bryant from Camille_Woodworking. He sprays all of his finishes and also showed a demo on how to evenly spray your furniture piece.

Here’s an awesome tutorial on how Amanda finishes her furniture.

Alex from Mr_Buildit likes to use wipe on polyeurethane. Here’s his process:

Good luck with all of your furniture building and finishing!

As always if you have any questions or comments please email or comment.


Posted in DIY Tutorials, Uncategorized

DIY Halloween Crafts

DIY Pumpkin String Art

img_0244

String art is fun! It takes a little patience, but the end result is always a conversation piece! Begin with a piece of 1×8 pine,stained or painted to your liking. Print off an outline of the pumpkin that will fit your board.img_0255Next, make dots around the edge of the entire picture,approximately 1/4 ” spacing between each dot-this will become your template for nail placement. Tape the template to the board. Using one nail, tap firmly on each dot to make a hole in the wood, until you’ve gone over the entire template. Remove paper, and begin driving in each nail (18 gauge, 3/4″ wire nail) half way into the board.

Once finished nailing, it’s time to string! There is no right or wrong way, just fill it in to your liking! In the picture shown, I numbered the order of color placement to achieve a more realistic look. Have fun and Happy Fall!

DIY CEMENT SKULLS

Plaster Skull.
Mix plaster powder with water in a 1:1 ratio.
pour mixture in plastic mold. Allow 24 hours to set. Once fully cure you can paint it.

DIY 4×4 PUMPKIN POSTS

img_0246

If you have a miter saw these are super simple. If you don’t- any big box store has a cut station and can do your cuts for you. Sizes can vary-  Right now at Target they have pre-cut vinyl to decorate pumpkins with. I picked up a package of gold dots for $3.99. They also had chevron. My gal Hillary from @yohillscrafting made these in about an hour. She found twigs in her from yard and leftover green tool. Painted the post white, applied the polka dots and then repainted the post orange. Once you paint over the dots- simply remove them for your cute polka dot effect! These were so cute and a 4×4 post was $8 from Lowe’s!

Posted in DIY Tutorials

DIY Faux Shiplap Wall

image

Our laundry room is located in the walkout basement level of our home. Directly above it is the kitchen. When we were remodeling our kitchen, the husband incorrectly installed our new kitchen hardware. This caused a wonderful little slow leak that trickled down to our laundry room! After we discovered the leak and fixed it- this is what we were left with. This provided the perfect opportunity to replace drywall and instead of paint… install shiplap!

This is a quick tutorial because I actually found the most fantastic tutorial EVER right HERE! Right up My Alley gives the best tutorial on how to install a faux shiplap wall. I followed her instructions to the letter and had awesome results! She even gives you a grocery list you can take to your local home improvement store.

Here’s some progress photos:

image

image

The only difference between our tutorials are that my local box store didn’t carry birch so I used oak. The results however were the same.

image

I used some super cheap trim around the edge of the walls. It was about $.89 for 8ft. The entire wall was stained with Varathane Weathered Grey.

Thanks for following along! If you have any questions please comment or email!


Posted in DIY Tutorials

DIY Barn Door for $25 in wood.

My local Home Depot has this fantastic tongue and groove wood for around $5 a piece. I needed a door that was about 7ft tall and this can as an 8ft piece, which was exactly what I needed!

The first step was cutting my boards down to 7ft with my miter saw. Once this was done I used liquid nails and surebonder wood glue and before I slid the tongue into the groove I squirt the glue into the groove.

I let this sit for about 2-3 hrs with clamps on so that I didn’t have to do anything else in regard to keeping the boards together. While it was drying I cut off the edge of the door that had the tongue sticking out. I used my Ryobi Jigsaw for this. I love my jigsaw! I use it a TON! My Ryobi has never let me down, I have had some cheaper jigsaws that break quite easily. (I purchased these from Harbor Freight.–side note– not all tools are created equal and the saying is true YOU do get what YOU pay for.)


After this and also while the glue was drying I used to end boards for decoration purposes as well as added reinforcement to keep the tongue and groove together. I use Spax screws on all of my builds for many reasons but the biggest are because they are SO easy to use- it doesn’t take much arm muscle, I can buy one box of multi use screws for several types of projects, and they are pretty screws so they don’t make my pieces look ugly! I decided to use a reclaim piece of wood for this process. It was part of the siderails on an old bed. After securing it with Spax Screws I sanded off the old stain so that the door absorbed the stain equally and didn’t look to different because I used different wood types.

When trying to decide which style of barn door you want I found this pinterest page to be super helpful in showing all of the different styles you can make.

Once the glue was dry I took of the clamps and stained my wood. I used Dark Walnut Varathane as well as Weathered Grey very lightly over the Walnut.


I ordered my hardware from Amazon. I found it for a whopping $75! (total steal) I have made my own hardware before, but this was such a good price and eliminated several steps of making my own hardware it was worth it.

Here’s what this little beauty looks like hung right outside my closet! Thanks for reading. Any questions- please email or comment. Thanks for stopping by!

image

image


Posted in Uncategorized

Hello

This is the excerpt for your very first post.

Source: Hello

Posted in Uncategorized

The IG Build-Off with Ana White and David Sheinkopf

Giveaways are luck of the draw, but what if there was a building  CHALLENGE issued to all the amazing IG builders out there and that challenge was judged by HGTV host David Sheinkopf and star of HG…

Source: The IG Build-Off with Ana White and David Sheinkopf

Posted in DIY Tutorials

DIY Crown Molding

image

Crown Molding is one of the best ways to customize your home and add value to it. Most people think crown molding is really hard to do, but I wanted to add color to my daughters ceiling and I thought the crown molding would really help the flow of the room.

Here’s what it looked like before

:image      image

It looked good, but not great- it definitely  needed a little something to bring it all together. I had already done base molding and chair railing so adding the crown molding seemed like the perfect touch.

The absolute BEST tutorial I have found is by Eric Rosenfield. His company UDECOR offers great how to videos and their business goal is to help YOU do your projects with their products. They specialize in Ceiling, Molding, and Accent Elements.  Jim has several  YouTube videos that show you how to add accents to your home. The one I used for this project was How to Cut Outside and Inside corners for crown molding.

This project took me a few hours to complete and I cut and installed it on my own using a miter saw and a finish nailer. . One of the awesome tips Eric gives is how to set your molding on the fence before cutting it. I took pictures above so you can see what this looks like.

Once the angles were cut I set the crown molding on the top of my wall and bottom of ceiling and used my finish nailer to install. This is what it looked like:

Because walls typically aren’t exactly 90′ angles they don’t always match up perfectly when installing. But the fantastic thing about these little gaps is caulk! I’m obsessed with caulk. I love how it finishes any project you were working on. It’s very easy to use and when you squeeze it into the gap and give it a rundown with your finger and wipe it with a wet cloth your corners look like this:

The finish project really does add a wonderful touch to her room and I love the flow from the wall to the ceiling.

I highly encourage you to look at UDECOR on you tube. I have viewed alot of different how to’s on cutting and installing crown molding and this is by far the best I have ever seen.

Good luck and if you have any questions please comment or email me! Happy crowning 🙂

Posted in DIY Tutorials

DIY Wood Dowel Arrows

image

These arrows will be the perfect addition to the bedroom update in my little peanut’s room. I purchased the dowel from Jo-Ann fabrics store. They have an awesome selection of DIY products in addition to an array of fabrics! I’ve included this link to amazon.com if you want to order your dowel or don’t have a JoAnn’s nearby.

I also used left over wood pieces for my arrow head and “feathers”. Here are some pictures to show you how I the cuts looked and how I glued them together. I have discovered the most fantastic product for gluing wood together! It’s a cordless glue gun by Surebonder and the best part is that it has Wood glue sticks.

I started with Mod Podge and craft paper I purchased at Michael’s because it was on sale for $.20. After cutting my arrow pieces I started with the arrow head and used modge podge and paper to cover it.

I wanted to use paint and paper so there weren’t too many patterns going on. I absolutely love Cece Caldwells paints. This pink is called “Pink Lady Slipper.” For the other Arrows I used Destin Gulf Green.

I stained the dowels using Jacobean by Minwax, then used my surebonder wood glue to put everything together.


Here’s another picture of the outcome. I used a brown ink pad to distress the edges.

imageAs always please let me know if you have any questions! Thanks for stopping by.

Posted in DIY Tutorials

DIY Fireplace Makeover

Our house was built in 1978. In 1978 a huge brick fireplace apparently was in style. Since we bought the house 12 years ago it has been nothing but an eye sore. I’ve always wanted a mantle and to have the fireplace redone- but in my mind- this was too costly of an expense and I always saw other projects that needed to be done before this.

During Christmas when we once again didn’t have a place to hang our stockings, silly as it sounds, I decided I wanted to find a mantle to buy for our fireplace. I looked online and found something for about $160. Then I looked on Pinterest for inspiration, duh, and I came across THIS photo from Eat, Sleep, Decorate:fireplace

This was my inspiration. But THIS is how I knew I could do it. Young House Love is an awesome blog, by the cutest couple ever! John and Sherry gave step by step plans on how they remodeled their brick fireplace. After reading it I decided I wanted to attempt the same thing.

Here’s what I was dealing with:

IMG_2176

Yuck right?? So off I went to Lowe’s for supplies. I purchased 1x3x12 pine, 1x2x10 pine, 1×1 pine, 1- 10 ft base board, and 2 sheets of MDF. I can’t say exactly how much you should buy because it definitely varies depending on the size you are trying to cover. I also purchased 1x8x10 poplar for the mantle. I started with assembling the mantle and I used a tutorial from Shanty2Chic which they explain how to build floating shelves. This essentially was the same thing I wanted, except on a larger scale. To put the mantle together I used my Ridgid Finish Nailer and my miter saw. Once this was finished I stained it with Minwax Special Walnut. After 2 coats of stain, 6 hours, and 3 coats of high gloss polyurethane I mounted it and moved on to the surround.

My original intent was to cover everything with MDF. While I was reading about Fireplace makeovers, I discovered that a fireplace surround made of wood needed to be 6-9″ from the hearth to be considered “code”. This meant I needed to re-evaluate my original thought and come up with some kind of stone before I started my wood surround. After measuring out 9 inches. I cut my first two pieces of MDF with a table saw and assembled to the existing brick. This was tricky! Thanks goodness I had a tutorial from Contractor Chronicles to give me an idea of what I was doing. I also used special Mortar Screws as well.

IMG_2177

That’s a progress photo. As you can see I used 1×3 on the outside of the fireplace and MDF for the panels. The reason I mounted the mantle before starting the surround is because I am no artist. I am a visual person and wanted to be able to see the “big picture” while putting the casing together. Once this was done I wanted to add some trim work, so back to Lowe’s for some decorative squares and more 1×1. Here’s a progress photo:

I used 1×1 to cover the lines where I had to install separate pieces of MDF and I added the square decorative piece to give it a nice look,then finished it off with some 4″ base molding.This was all I had originally intended to do and once it was painted- here’s what it looked like:IMG_2200

I left a 9″ surround for code and had decided on a stone surround. But as I stared at this picture I actually hated it! The brick was KILLING me. It looked like a half completed project. It was just so wrong! I tried changing the decor and adding a piece of crown molding to the top.

IMG_2218

My husband kept telling me over and over that he loved it and what a great job I had done… but come on! This? No bueno’. SO I waited until Monday, when he was at work, and ran back to Lowes for some more 1×3. I made some cuts and installed the rest of the scrap MDF I had and trimmed it up with 1×1, 1×3, and 2 more decorative pieces.

Heres what I ended up withimage

Finishing it to the top did the trick! I LOVE LOVE LOVE it!! The stone was our most expensive splurge which was about $15 a piece (contractor pricing), BUT it was leftover from a project my Dad’s friend had used it on and so he gave it to us for free!

NOT counting the stone- this project was $60 for the mantle- because we used POPLAR wood and $100 for the wood, MDF, paint, screws, glue, and nails. I was able to do a mantle and surround for the same price as ordering JUST a mantle online.

Here’s the disclaimer: While I am not a professional carpenter, this is not a beginner’s project. The mantle absolutely is! The surround required use of my  Ridgid Table Saw , finish nailer, miter saw and hand drill. I usually tell beginners the tools I started with were a miter, nailer, and drill. Using a Table Saw if you don’t have experience can be very tricky when learning how. Before I started using my Ridgid Table Saw- I watched all of their tutorials on Ridgid You Tube before trying my saw for the first time. Their tutorials show you how user friendly their tools are.

I LOVE my fireplace! Every time I walk into my house it’s the first thing I see and I always smile. I love that I did it! I love that it was so cheap! I love how bright and cheerful and clean it looks. It makes me happy and I know that’s silly- but that’s okay.